Thursday, September 12, 2013

Keys to Success: Mums


It's Fall, Y'all! 
Since Fall is such an exciting time of year for gardening- festive plant colors and textures, ideal temperatures, increased rainfall, etc.- we thought we'd share a Fall-tastic series of posts for you on how to make sure your gardening efforts are successful this Autumn! We're calling it the 'Keys to Success' series, and we'll be posting on a new, Fall-specific topic each week. We hope you enjoy!


Let's talk about Mums this week! Mums are a quintessential element in Fall decor. Whether inside or out, Mums are perfect for adding vibrant color and soft texture to any Fall scene. And they're a great value-per-dollar plant, too! Not only do Fall Mums make a huge visual impact, they are perennials-- plant them in your beds after you put away your Fall decor, and you'll be able to enjoy them for years!

In case you're going to incorporate Mums into your Fall decor this year, we'd love to share some of the things we know about this beautiful Fall-blooming plant!

Here are our top tips for getting the most out of your Mums this fall:


1. Water a few times per week
Plants in containers need plenty of water. As the season gets cooler, though, your Mums will likely need less water; stick your finger in the soil to test if there's enough water- if the soil feels dry, give it a drink. Just be sure to avoid keeping the soil soggy.
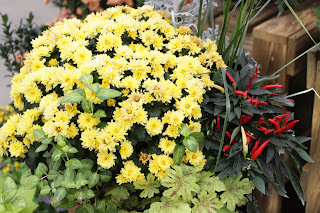


2. Decorate
Pair Mums with pumpkins, gourds, straw bales and Indian corn for classic Fall decor.


3. Use good soil
If you're going to plant your Mums, use a good soil. For planting in containers, use our Strange's Soil to provide a well-draining, supportive planting media. If you're planting your Mums in a bed, incorporate some Perma-til into your soil to improve drainage.


4. Use mulch! 
If you plant your Mums in a bed to overwinter, make sure you use a 1.5-2.5" layer of mulch to provide insulation. The foliage of the Mum will die back after the first hard frost, but if the roots of the plant are well-insulated, your Mum will start growing again in the spring!


Thanks for stopping by to learn about our Mum tips-we hope your Fall plantings and decor are a beautiful way to welcome your friends and family to your home!

Happy [Mum] Gardening!

Thursday, September 5, 2013

Keys to Success: Pansies!

It's Fall, Y'all! 
Since Fall is such an exciting time of year for gardening- festive plant colors and textures, ideal temperatures, increased rainfall, etc.- we thought we'd share a Fall-tastic series of posts for you on how to make sure your gardening efforts are successful this Autumn! We're calling it the 'Keys to Success' series, and we'll be posting on a new, Fall-specific topic each week. We hope you enjoy!


This week's topic is Pansies! And in honor of the completion of the first full week of this year's college football season, we'll be using a cheeky football metaphor throughout this whole post- hope you love football as much as pansies!


1. Use a good Soil


They say if you're going to have an undefeated football season, you've got to win the first game. Same goes for planting pansies! If you're going to have a champion (bloom) season, you've got to 'win the first game.' And in our little football metaphor, the first game is the soil, and winning is making sure your soil is in peak condition to support your winning pansy lineup. 
Here's what we recommend to help you win the first game:

If you're planting your pansies in a container:
Fill your containers with our professional Strange's Mix potting soil  Our potting soil will provide a good soil consistency to promote healthy root establishment as well as provide nutrients for your pansies.

If you're planting your pansies in a bed:
Mix some Perma-til with your existing bed soil to improve drainage. Pansies don't like to have 'wet feet' and your plants will be more likely to win if they're not bogged down in soggy soil.

2. Score the Root ball


Every winning coach has an exciting pre-game pep talk to pump up their players. As coach, you ought to take a moment to 'pump up' your pansies before the first game: 
When it comes time to plant your pansies, grab a trowel (or even use your fingernails) and break up the rootball a little. This is like the proverbial pre-game high five- it jazzes up the pansy's roots and encourages it to work quickly to establish itself on the field in its new container. 

3. Feed Your Pansies


Your pansies need nourishment! Like football players, pansies need a good 'water break' every so often to replenish the energy they're using to bloom and grow. Try a good fertilizer like Fertilome's Premium Bedding Plant Food, or Greenview's Pansy Food. 

4. Fight Pests


Think of your beautiful pansies as the goal line, and your pest defense tactics as the defensive line. A good defensive line is strong, has a coordinated plan of defense, is ready to make quick decisions to react to the unexpected, and is only used when the other team has the ball.
Similarly, you want a coordinated plan for fighting pests that you only use if you need to. The biggest pest challenge to pansies is the Pansy worm, and the best way to treat your pansies for Pansy worm is with Sevin or Thuricide. Remember, it's always a good idea to rotate products to prevent insects from building up an immunity to any one product. 

5. Apply Mulch
In the world of pansy football, if pest defense is your defensive line, mulching your beds is your offensive line.  Picture this: you've got your star quarterback in position, ready to throw the winning touchdown pass. He looks up to find his receiver and realizes he's got no line protecting him and the defenders are barreling down the field to sack him. Nobody wants that (well, no one rooting for the offense, anyway!)
And nobody wants that in their Fall pansy planting, either. So once you get your star pansies in place and ready to win the game, make sure you mulch them! All sorts of factors (water availability, weed competition, frost) will come to challenge your pansies, but if you provide the offensive protection of mulch, your pansies will be set up to do just fine!
When mulching, apply a 1.5-2.5" layer of mulch to improve water availability, reduce weed growth, and protect from frost damage. It will make all the difference. Plus, it looks tidy!


Thanks for stopping in to learn about the Keys to Pansy Success! We hope you have a beautiful pansy display this year, and that your favorite football team has a championship season!

Happy [Pansy] Gardening!

Tuesday, August 27, 2013

Fabulous Ground Covers

Who doesn't love a good ground cover? Anyone?
With so many benefits, it's hard not to appreciate all that ground covers do for your landscape and our environment. What benefits are we talking about? Why, we're glad you asked!

The 3 Best Benefits of Fabulous Ground Covers:

1. Their ability to cover ground- as simple as that may sound, one of the greatest benefits a ground cover provides is it's ground-covering abilities. By spreading its roots and leaves over the ground, a ground cover can dramatically help prevent the erosion of valuable topsoil in your landscape and in the environment!

2. Their Weed-Reduction Capability- not a fan of weeding? Plant a thickly-growing ground cover! Once the ground cover establishes itself, it helps to significantly reduce the weeds that grow in your beds. 

3. The color and texture they add- Ground covers come in all sorts of textures and colors and can add some great interest to your landscape! Plant a big swath of your favorite ground cover for a vast, carpeted effect, or mix a few varieties together for a mottled look!

Now that you know the great benefits ground covers provide, let's talk about a few Fabulous Ground Covers for the Central Virginia area:

English Ivy


If you've ever taken a stroll through a Gillette garden, you know the importance of this timeless ground cover. A tidy patch of ivy at the base of a tree lends a quintessentially 'Virginia' feel to any landscape. It does well in sun or shade, and is evergreen. Just be sure to keep an eye on this one- it's an aggressive spreader and will 'cover' you're whole landscape if you let it!

Green Liriope


This lush, evergreen ground cover is a 'tough as nails' option for covering ground. Easy to plant and establish, green liriope quickly defines a space with a soft, sweeping texture. It's great for planting in sun or shade and produces pretty purple or white flower stalks each summer.

Variegated Liriope


Cousin to the all-green variety, variegated liriope is a great way to add a little color and texture to your yard. The soft green and white blades look wonderful planted en mass. A little bit more sensitive than the green variety, it's best to give this liriope a little shade. Cut it back after each winter to get rid of any frost-burned blades.

Dwarf Mondo Grass


This beauty has a fun, spunky appearance! Its short, green blades fan out from the center, creating little green star-burst effects wherever it is planted! Dwarf Mondo Grass is a slow-growing ground cover that does well in the shade. Once you establish a stand of it, you've got a lush, carpet-like covering that is so fun to look at!

Pachysandra


This high-texture, evergreen ground cover is a superb choice for shady spots. It's low-growing nature lends a fun layered effect to you yard when it's planted in a large swath. It's green, glossy leaves create a tidy appearance wherever it is planted!

Of course, these five examples of Fabulous Ground Covers are just a few of the really beautiful ground cover options available to you! What's your favorite ground cover? Do any of the above make your list? Have you planted a large swath of ground cover? We'd love to hear about your experience!

Thursday, August 15, 2013

It's Time to Start Some Cool-Season Veggie Seeds!


You're probably up to your ears in zucchini and tomatoes right now, but believe it or not, it's time to start planning for (and planting) your fall garden! Planting a Fall garden provides you with fresh, home-grown produce well into the coolest months of Fall; and the vegetables that grow well during the Fall are great for hearty Autumn soups and dishes!


Fall gardens are so exciting and often under-appreciated! While some star cool-season vegetables can be grown well during the Spring, most perform excellently during the Fall. Why? Planting your vegetables in  warm weather allows them to establish in a comfortable environment; as the season gradually gets cooler, the cool-season vegetables flourish and produce higher yields than they would in the Spring (since during the Spring you plant when it's cool and the weather gets progressively warmer.) 


When it comes to planting your Fall garden, you have the option to sow seeds or start with small plants. The gardeners around Strange's like to plant their Fall gardens using a combination of seeds and plants. We love seeds for the wide selection of varieties available, and for the oh-so-gratifying experience of watching tiny plants burst out of the soil. We love starting with small plants for the ease of establishment they afford. So, we do both! 


Not sure what to grow? Here's a list of some of our favorite plants that we carry, as well as how to plant them and the recommended time to start them:


  • Arugula- sow seeds in August and September
  • Beets- sow seeds in August and the first half of September
  • Broccoli- plant transplants in August and the first half of September
  • Brussel Sprouts- plant transplants in July and August
  • Cabbage- plant transplants in August and the first half of September
  • Chinese Cabbage-sow seeds in August or transplant in the last week of September
  • Carrots-sow seeds from July through the first half of September
  • Cauliflower-sow seeds or plant transplants in August and September
  • Collard Greens- sow seeds or plant transplants in August into the first half of September
  • Kale-  sow seeds or plant transplants in August and September
  • Kohlrabi-  sow seeds or plant transplants in August into the first half of September
  • Lettuce (Leaf)-  sow seeds or plant transplants in August and September
  • Lettuce (Head)- Sow seeds the last half of Aug or first half of Sept, transplant the last half of Sept.
  • Mustard-  sow seeds in August and September
  • Peas-  sow seeds in August and September
  • Radishes-   sow seeds in August into the first half of September
  • Rutabaga-  sow seeds in July, August and September
  • Spinach-  sow seeds in August, September and into the first half of October
  • Swiss Chard- sow seeds or plant transplants in August into the first half of September

If you're interested in planting a Fall garden, stop by our Garden Center! Our staff is eager to have fun helping you plan what to plant and can give you pointers on growing each crop. 

Happy (Fall) Gardening!


Thursday, August 8, 2013

Top 5 Reasons to Love Crape Myrtles


Of all the great flowering trees out there that grow well in the South, the Crape Myrtle is certainly a favorite! And this blooming beauty definitely lives up to all its accolades-
let's take a minute to talk about why these trees are so well-loved:

TOP 5 REASONS to LOVE CRAPE MYRTLES

5. Great size selection

When choosing a plant for your yard, it's often difficult to find a variety that will fit in the space you have available. (We've ALL spent time frequently pruning back a plant that's just too large for the spot we planted it in...) That's why we're voting that size selection is a great reason to love crape myrtles! From the smallest varieties like 'Pokomoke' (2-3') and the Razzle Dazzle collection, to the largest varieties like 'Natchez' (30'+) and 'Muskogee' you can find a crape myrtle that is perfect for your space!


4. Attractive Branching Structure

Year-round, crape myrtles are beautiful to look at! Even in the dead of winter it's easy to appreciate the appearance of this plant; its branching structure is graceful and  architectural, adding great lines to your landscape.


3. Wide Color Range

In addition to touting a wide range of size choices, Crape Myrtles offer an excellent palette of flower colors! You can find a specimen in nearly any shade of red, pink, purple or white, which makes this plant a versatile choice for any garden!


2. Seasonal Interest

Though known for their spectacular show of flowers in the summer, Crape Myrtles offer great attributes during the rest of the year as well! In the Fall, most varieties produce a beautiful show of autumn-colored leaves (the color that the leaves change depends on the variety of the crape.) The winter months showcase the beautifully striated bark that is also unique to each variety. No doubt about it, year-round Crape Myrtles are pretty plants!


1. Long Flowering Season

And lastly, probably the most popular reason to love Crape Myrtles is their long flowering season! While most other flowering trees sport their blooms for a few weeks, Crape Myrtles reliably bloom for about 3 MONTHS! And their show of flowers is spectacular-- typically the tree's canopy is awash with color from mid-June through mid-September. 


There you have it- 5 GREAT Reasons to Love Crape Myrtles! If you're not a fan already, we hope you are now.

Happy Gardening!


Tuesday, July 30, 2013

2013 Tomato Tasting Results!

Hi all you tomato-lovers out there!

This past Saturday we hosted our Annual Tomato Tasting at our West Broad Street Location!


Our tomato-enthusiasts (both guests and team members alike!) had fun sampling almost 30 heirloom varieties of tomatoes that we've been growing organically here at our garden center this summer!

In addition to enjoying the samples, we asked our enthusiasts to help us choose Richmond's Favorite Tomato for 2013. The results have been tabulated, and we're excited to share the winners!

In Third place, we have: 'Prudens Purple'


This beauty is praised for it's taste and relatively crack-resistant nature. It's related to the Brandywine variety, but produces fruit more quickly than Brandywine. It's fruit typically weighs about 1 pound and has a pretty, pinkish-purple skin. If you're looking for a plump tomato to grow (or eat!) this is a great choice!

Coming in Second place, we've got: 'Brandywine'


Brandywine is touted as the darling of heirloom tomatoes. Dating back to the mid-1880's this long-time favorite is a sweet, beefsteak-shaped tomato. It is late to ripen but, in our opinion, is worth the wait!

And now, the results you've been waiting for...

Richmond's Favorite Tomato of 2013 is: 'Super Snow White'


This prized tomato is unique in its appearance and generous in its flavor! About the size of a ping pong ball, this ivory-colored tomato is both sweet to look at and to taste! It's easy to grow and produces fruit fairly quickly. Great for topping salads and decorating dishes, Super Snow White is a great heirloom variety to grow!

There were several other favorite varieties that just missed the official winner's circle status! We'll call them 
the honorable mentions: 

Kentucky Beefsteak
Speckled Roma
Kellogg's Breakfast
Super Steak
Black Cherry
Beefsteak Rocky Top
Cherokee Purple

A big 'Thank You' to all of you who lent your discerning palate this weekend to Richmond's Annual Tomato Tasting! We're thrilled with the results and we highly encourage all Richmonders to try growing one of these tasty tomatoes next spring! We'll be ordering seeds of all of the heirloom varieties that you preferred so that you can try growing your own next year!

Happy [Tomato] Gardening!

Thursday, July 25, 2013

Vertical Gardening- Indoor Edition


Hi plant lovers!

Has anyone out there seen the beautiful 'living walls' that have been popular over the last few years? So pretty! 


While these lush indoor green spaces have starred in many swanky, newly renovated spaces, it's easy to bring the look into your home or office!

We've seen some beautiful examples of interior living walls floating around Pinterest, like this:


and this:

and this:

Swoon-worthy, right? But don't be intimidated by the scale of these beautiful living walls! You can create your own vertical green space on a smaller, very managable scale! Here are some fun examples we found: 


We love the succulents for their unique shapes and soft colors, and a kitchen lettuce garden is such a great idea! Look at how compact it is; fresh salad everyday for a few feet of floor is our idea of a good use of space!

We've been experimenting with our own living wall for a few months now and have been really pleased with the results! It's about 1' wide and 2.5' tall and makes a big impact with the combination of color and texture in showcases. What do you think?:


The frame is sleek and decorative while the back (the side that is hidden) is specially designed to prevent water from damaging the wall space behind. (A very important quality if you are hanging your living wall on drywall!)

If you're interested in vertical gardens, we highly encourage you to get started! They're a fun, creative way to decorate your indoor space, and they provide great clean air benefits, too! (In case you missed that post

Happy [vertical] gardening!